Tuesday, April 24, 2018
EASY Chewy No Bake Granola Bars
I make a version of these chewy granola bars every week for our busy on-the-go family. They are made with delicious natural ingredients and can be put together very quickly. I change them up each time I make them by altering the combinations of nut butters, dried fruit, seeds, nuts, coconut and dark chocolate. They are always chewy and amazing and we never get tired of them. When our son starting eating solids we became more aware of EVERYTHING that we buy for our family and made some pretty significant changes in the way we shop, cook and eat. He loves granola bars so I decided to recreate my own healthy natural version. I feel like this version is better for us, but also much more cost effective. If you are looking for healthy on-the-go snacks that are easy to make, versatile and delicious, give this recipe a whirl.
Ingredients
Makes 10 granola bars
1 cup pitted dates
1 1/2 organic quick oats
1 1/4 mixed dried fruit, nuts, seeds, coconut or chocolate
( The picture above includes: raisins, craisins, unsalted sunflower seeds, coconut, and dark chocolate chips)
1/4 tsp sea salt
1/4 cup nut butter or sunflower butter- I used natural peanut butter in this version
1/4 cup of honey or maple- I used honey in this version
Directions
1. Line an 8x8 pan with parchment paper or use an 8x8 silicone pan.
2. Pulse the pitted dates for about a minute until the dates form into dough like ball.
3. Dump the pureed date ball into a medium bowl and add the oats, salt, as well as the 1 1/4 of desired dried fruit, nuts, chocolate and coconut.
4. Microwave the nut butter and honey for 30 to 45 seconds, stir and add into the bowl.
5. Mix the ingredients making sure to break up the date ball and have all the topping well incorporated.
6. Dump into the 8x8 pan and flatten the mixture evenly. Cover and store in the fridge to set for at least 1 hour before cutting. Slice into 10 full size granola bars and continue to store in the fridge for up to one week. Once they are sliced you can individually wrap them for lunches.
7. Enjoy!
Note: If your child has a nut allergy you can substitute sunflower butter in this recipe. Most schools and day cares are nut free but will allow sunflower butter.
Tuesday, January 16, 2018
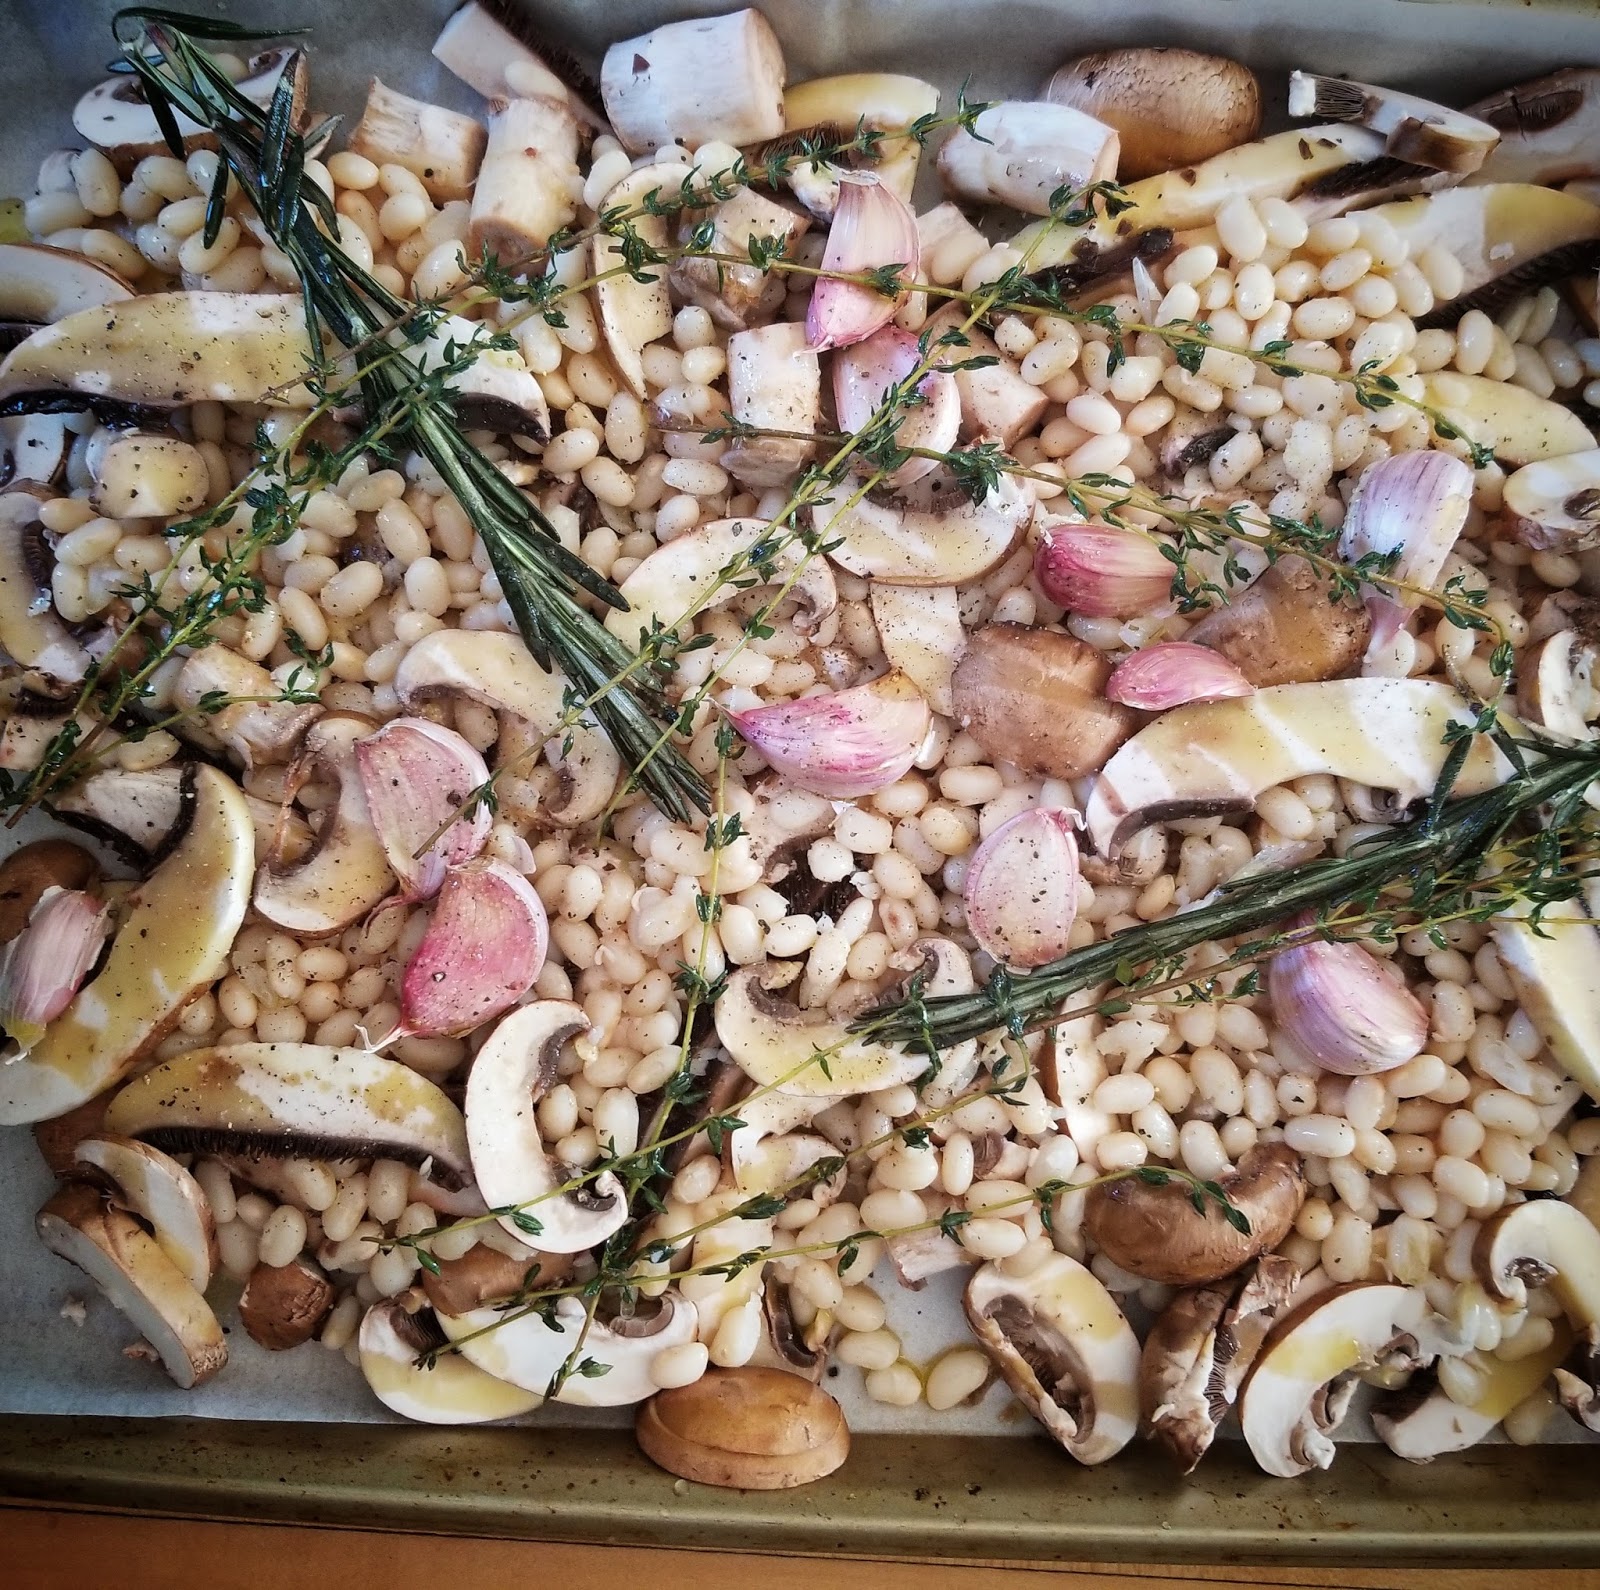
White Bean and Roasted Garlic Mushroom Soup
Ingredients- serves 4
1 can white navy beans- rinsed well and drained
2 portobello mushrooms- brushed clean and sliced with stems
12 cremini mushrooms- brushed clean and sliced with stems
10 cloves garlic- leave skins on for roasting
2 stalks fresh rosemary
6 sprigs fresh thyme
extra virgin olive oil
salt and pepper
1 container (900ml) no salt added chicken or vegetable stock- I used chicken
Parmesan Crisp Garnish
Directions
- Preheat oven to 400 degrees.
- Line a large sheet pan with parchment paper.
- Add the beans, garlic, mushrooms and herbs to the pan and toss with a good amount of olive oil and salt and pepper. Make sure all the veggies and herbs are coated well with the olive oil. I did not measure the amount I used but just make sure you do not have oil pooling at the bottom of the pan. Everything should be well coated.
- Roast for 30-35 minutes on the center rack of your oven. The garlic cloves should be very soft and the beans will have a golden color.
- Remove the skins from the garlic and discard. Place the garlic back onto the pan.
- Remove the herbs from their stems leaving the leaves on the vegetables.
- Set aside 1 cup of the roasted vegetables and herbs for garnish if desired.
- Place the sheet pan of cooked ingredients into a blender and add half a container of stock. Puree until smooth. Add additional stock if you like the soup less thick until your desired consistency is achieved.
- Place the soup into a large pot and bring to a simmer. If you are making the garnish, this is a good time to do so while the soup is lightly simmering.
- To serve the soup: garnish with olive oil, Parmesan crisps, roasted mushrooms, herbs and beans.
- Enjoy!
Monday, December 11, 2017
One Pan Chicken Parmesan
Chicken Parmesan is a family favorite and I have many fond memories of this classic Italian meal from my own childhood. I was taught to make this meal the traditional way with breading and although it is a VERY delicious way to experience this dish I decided to make a simplified version. Instead of dredging the pounded thin chicken in a bowl of flour, egg and breadcrumbs, I seasoned the chicken and seared it in a nonstick pan. Using the same pan, I covered it in sauce,cheese and herbs and tossed the pan in the oven for 15 minutes. With my toddler running around I have been taking some of our favorite meals and simplifying them to save on time and additional dishes. This dish was just as wonderful without having it breaded and fried before covering it in sauce and cheese. If you love Chicken Parmesan as much as we do, give this simplified version a whirl. My toddler went crazy for this meal and I served his dish with peas and spaghetti that I tossed in olive oil, herbs and some of the sauce from the bottom of the pan.
Ingredients- Serves 4
2 boneless, skinless chicken breasts
salt, pepper, garlic powder
1/4 cup olive oil
1 1/2 tomato sauce ( I used PC black label marinara sauce- it is all natural with no preservatives)
2 tbsp each basil and parsley- fresh or dried- I finely minced fresh
1/2 cup grated Parmesan cheese
1 cup shredded mozzarella
Directions
Preheat oven to 400 degrees.
- On a cutting board slice each chicken breast into 2 making 4 chicken fillets. If you prefer to save even more time you can purchase the chicken already sliced and pounded thin. It is more expensive but a great time saver. I usually make slice and pound my own.
- In order for the chicken to sear evenly you need to gently pound it thin making sure it is the same thickness. If you do have a meat mallet simply cover the chicken with parchment and gently press the pan you are going to use over each breast until you achieve the results you are looking for.
- Heat a non-stick pan.
- Season the chicken breasts on both sides with salt, pepper and garlic powder.
- Add the olive oil to the pan and sear the chicken on the first side until a deep golden color. About 3 minutes. Turn the breast over to sear the other side. Once seared, remove from the heat and cover each breast with the tomato sauce, Parmesan, herbs and mozzarella. Make sure to cover the entire breast with sauce and there should be extra pooling in the pan. See picture.
- Bake for 15 minutes or until bubbling and golden.
- Serve with Caesar salad, spaghetti or any side dish you wish.
- Enjoy!
Thursday, December 7, 2017
One Pot Cabbage Roll Stew
I love cabbage rolls in the winter and this is a deconstructed fast an easy version of the classic rolls, with my own special twist. I toasted some fennel seeds in the olive oil before adding the ground pork and instead of rice I used Italian Farro. The fire roasted tomatoes, chicken stock and ground pork creates a wonderful indulgent broth that is so comforting on cold winter days. This one pot meal is easy to make, packed with flavor and is incredibly hearty. I was very happy with the results and I wanted to share this recipe with all of you.
Ingredients- 8 Servings
1/4 cup olive oil
1 lb ground pork
1 large yellow onion- diced
1 large carrot- diced
2 large celery stocks- diced
4 cloves garlic- minced
1 small head cabbage or 1/2 large head cabbage- thinly sliced
1 bunch parsley- stems removed and diced, leaves chopped and set aside for garnish
1 tbsp paprika or smoked paprika- I used regular paprika
1 tsp garlic powder
1 tbsp fennel seeds
1 container (900 ml) no salt added chicken stock
1 can fire roasted tomatoes
salt and pepper as desired
110 grams Italian farro
Directions
- Heat a large heavy bottom pot and add the olive oil and fennel seeds. Toast the fennel seeds for about a minute. They should be sizzling and fragrant.
- Add the ground pork and mix with the fennel seeds. Stir scraping the bottom of the pot making sure the meat and seeds do not burn.
- Once the meat is cooked, add the onions, carrots, parsley stems and celery. Saute for 6 to 7 minutes until the vegetables start to caramelize.
- Add the garlic and saute for a minute or two.
- Add the paprika and garlic power and mix into the meat and vegetable mixture. Once the dried spices hit the pot they will toast adding more flavor to the dish. Saute for about a minute.
- Deglaze the pot with the chicken stock making sure to scrape all those wonderful flavor bits from the bottom of the pot.
- Add the fire roasted tomatoes and bring the stew to a boil.
- Add the cabbage and mix well. Season the stew with salt and pepper and turn the heat down to medium. Slightly cover the stew and cook for 10 minutes or until the cabbage is cooked.
- Add the farro and cook for 10 minutes or until the farro is cooked. The package I used indicated a 10 minute cook time.
- Add the chopped fresh parley to the stew and serve. Garnish with parmesan cheese if you wish.....I ALWAYS do!
- Enjoy.
Thursday, November 30, 2017
Broccoli and Cheddar Soup
I have been making a variety soups lately because my son LOVES them. It is a great way to have him eat lots of vegetables and protein and he is very proud to demonstrate his spoon skills. In the past few weeks I have shared my Cauliflower Soup with Maple Bacon and Thyme and my Fast and Easy Butternut Squash Soup recipes. This Broccoli and Cheddar soup is another great meal that is packed with vegetables and protein and I made it decadent without using butter and cream. I decided to add a large Yukon Gold potato to the soup to add a creamy texture without having to use heavy cream or butter. This is a great trick when wanting to cut out the fat without compromising great taste. One large potato and 1 cup of homogenized milk make this soup just as creamy and delicious without the extra calories. I also use 2 cups of cheddar because that could not be avoided when making a broccoli and cheddar soup. I have used this trick when making seafood chowder. I puree a portion of the soup that includes potato and it gives the chowder a wonderful creamy texture without all the fat.
I decided to take a shortcut by using frozen broccoli instead of fresh to save on time on a busy weeknight. I have no problem substituting frozen for fresh vegetables when making soups. Frozen vegetables are often frozen at their best and I find it much faster for weeknight meals. It cuts down on my chopping time allowing me to have dinner ready in 30 minutes or less.
I hope that you give this soup a whirl, and enjoy it as much as we do!
Please let me know if you have any questions by posting in the comments section below.
AA
Ingredients- Serves 6
1 large onion- small cubes
1 large carrot- small cubes
1 large Yukon gold potato- small cubes
4 cloves of garlic- diced
1/4 cup olive oil
1 tbsp paprika
1 tsp garlic powder
salt and pepper
1 bag (500 grams) frozen broccoli
2 cups of no salt added chicken stock
1 cup homogenized milk
1 tsp- Dijon mustard (optional)
2 cups of orange cheddar
Garnish options- Placing the garnishes on the table will allow your family to garnish their own bowl and will make dinner time fun!
chives
paprika
Greek yogurt
bacon
croutons
shredded cheddar
Directions
- Heat a large heavy bottom pot on medium heat and add the olive oil.
- Add the onion, potato, and carrot to the pot and saute for 5 to 6 minutes.
- Add the garlic and cook for an additional 2 minutes.
- Add the paprika and garlic powder to the pot and stir into the vegetables. Cook for about a minute.
- Delgaze the pot with the chicken stock scraping all the flavor bits from the bottom of the pot.
- Cook for 12 minutes until the potatoes and carrots are soft.
- Add the broccoli and cook for 4 minutes or until soft.
- Turn the heat down and add the milk and mustard. Once simmering remove from the heat.
- Using a hand blender or stand blender puree the soup. Once it is pureed slowly add the shredded cheese while the blender is running. This will melt the cheese into the soup and make it smooth and not sink to the bottom of the pot or blender.
- Once smooth taste and season with salt and pepper.
- Serve and enjoy!
Note: I used my kitchen aid stand blender and pureed the soup in two batches. I removed the clear circular top in the lid and slowly added a cup of cheddar cheese to each batch while the blender was running. I poured both batches into a new pot once pureed. If you are not ready to serve, place the pureed soup on low heat stirring often until needed. If the soup is too thick add a little extra stock while you are blending. I found the thickness perfect for us so I didn't add any extra liquid.
Tuesday, November 28, 2017
Fast and Easy Butternut Squash Soup
I have been making soup a couple times a week and this butternut squash soup is one of my favorite weeknight meals. It is fast, simple and incredibility tasty. It can be garnished with many different toppings to give it extra color, texture and flavor. If you are looking for a fast, filling and versatile soup, this is it!
Ingredients- 4 servings
1 bag (750 grams) of frozen butternut squash- I use PC frozen butternut squash on busy weeknights
1 red onion- diced
4 cloves garlic- diced
8 sage leaves (stems removed) - rosemary or thyme are also great substitutes
1/4 cup olive oil
1 (900 ml) container of no salt chicken or vegetable stock. - I used chicken
salt and pepper
Directions
- Heat a large heavy bottom pot and add the olive oil and sage leaves. Fry the sage leaves until they are dark green in color. This takes about a minute. Remove the leaves and set aside for garnish is you desire.
- Add the onions and garlic to the flavored olive oil and saute for about 5-6 minutes.
- Add the frozen squash to the pot and stir until the onions and garlic are well incorporated. Cook for another 5 minutes.
- Add the Chicken stock to the pot. I only add enough to just cover the squash. I add more after the soup is blended if it is too thick. If you add the entire container at this stage your soup could watery.
- Cook for 10 minutes until the squash starts to fall apart.
- Blend the soup in a blender or by using a hand blender in the pot. Add additional stock a little at a time ( if needed) until you achieve the consistency you are looking for.
- Season with salt and pepper and serve.
- Garnish with the fried sage leaves. Below is a list of garnishes that go well with this soup.
- Enjoy!
Sunflower seeds
Croutons/crostini
Toasted hazelnuts
Greek yogurt
Pomegranate seeds
Chives
Green onions
Sliced apples
Sliced pears
Thursday, November 9, 2017
Prosciutto and Sage Wrapped Maple Mustard Salmon Parcels
Crispy salty prosciutto, savory sage, and sticky maple mustard glaze makes this salmon dish so decadent and moist. It was the perfect balance of sweet and savory. I have been on a sage and maple kick all week and this meal came together because I had to use up all the sage, bacon and prosciutto I had in the fridge. I was really happy with the results and I had to share them will all of you. This will be the first meal I make for my hubby once he is home and he is going to LOVE it! The outside is crispy but the fish is so moist because it is steamed in the parchment after it is seared. The leeks with lentils and maple bacon are the perfect side dish that not only tasted great but also allowed be to skip the starch in this meal as the lentils are very hearty. I was able to do all the dishes while the parcels were baking in the oven which allowed me to spend extra time with my little one after dinner. I tossed our 2 plates and the sheet pan in the dishwasher and dinner clean up was complete. WIN!!If you have any questions about this recipe or any others, please feel free to comment below. Thanks for reading!
Ingredients
3 leeks- trimmed and sliced
2 cloves garlic- shaved or finely chopped
1 thick cut slice of maple bacon- finely diced (I used chemical free nitrate free)
2 tbsp unsalted butter
2 tbsp olive oil plus 2 tbsp for searing the salmon
1 can of lentils- rinsed and drained
salt and pepper
4 skin on salmon fillets
8 thin slices of prosciutto
12 sage leaves
4 tsp Dijon mustard
4 tsp maple syrup
cracked black pepper
- Preheat oven to 400 degrees.
- Heat a deep non stick pan on med high heat and add the butter and 2 tbsp of the olive oil.
- Add the leeks and cook for 4 to 5 minutes stirring often.
- Add the finely diced bacon and cook for another 5 minutes until the bacon is crispy and the leeks are caramelized.
- Add the garlic and saute for 1 to 2 minutes.
- Add the lentils and toss around incorporating all the ingredients. Once well combined turn off the heat and set the pan of lentils aside. Taste. Add additional salt and pepper if needed.
- Gently wash and pat the salmon dry on all sides.
- In a bowl mix together Maple syrup, Dijon and cracked pepper.
- Brush the flesh side of each salmon fillet with 1 tsp of the marinade. This should use half the marinade leaving the other half for later.
- Place two or three sage leaves on top of the marinated salmon and wrap 2 pieces of prosciutto around each fillet covering the fish and the sage leaves.
- Place a sheet pan size piece of parchment paper down. In the center on one half of the parchment place 1/4 of the lentil mixture down. Do this four times.
- Heat a clean non stick pan and add the remaining 2 tbsp of olive oil. Sear the salmon on all sides starting with the flesh side down. Be gentle with the salmon as you turn it to avoid it from breaking. Do not cook the salmon all the way through. Make sure to sear all sides crisping the prosciutto. About 1 to 2 minutes per side.
- Once the prosciutto is crispy turn the heat off and gently place each piece of salmon on the prepared lentil parchment parcels. Drizzle each piece of fish with the remaining marinade. Fold the parchment over and seal the parchment by rolling up the edges all the way around.
- Bake the parcels for 12 to 14 minutes. Place each parcel on a serving plate or bowl and let each person tear into their parcel. They can eat out of the parchment. If you prefer you can remove the parchment and plate the dish for each person.
- Enjoy!
AA
Tuesday, November 7, 2017
Cauliflower Soup with Maple Bacon and Thyme
Cauliflower soup is my new favorite way to enjoy this hearty vegetable. This soup was so silky smooth it is hard to believe I didn't add any butter, cream or coconut milk to it. The color was so vibrant and beautiful it really added that extra visual component to the dish. The crispy maple bacon was a great addition however, if you wanted to make this soup vegetarian you could just leave out the bacon and replace bacon fat with extra olive oil. I also added a little extra sweetness to the soup by swirling some local extra dark maple syrup as a garnish and a dollop of tangy Greek yogurt speckled with thyme leaves and lemon juice. There are many ways to garnish this soup but I really enjoyed the ingredients I used this evening. I hope this fall soup recipe finds its way into your meal rotation.
Ingredients
1 medium sized cauliflower- chopped
1 large yellow onion- cut in 6 wedges
4 cloves of garlic- left in husks
1 large carrot- chopped
6 sprigs of thyme plus extra for garnish
4 slices of maple bacon- sliced
2 tbsp olive oil
Salt and pepper
900ml chicken or vegetable stock- I used chicken stock (no salt added)
Garnishes
Crostini- slice the crostini and brush each piece with some olive oil and a sprinkle of garlic powder. Bake until golden and toasted.
6 slices of ciabatta
olive oil
garlic powder
Greek yogurt topping- mix the Greek yogurt
1/2 cup of Greek yogurt
1 tsp lemon juice
thyme leaves from one sprig
Maple syrup, crispy bacon and fresh thyme leaves are also a great way to finish this soup and add a little extra presentation before serving. If you do not want to make crostini, croutons are also a great option.
Directions
- Preheat the oven to 400 degrees.
- Line a sheet pan with parchment paper and place all the chopped vegetables, thyme and garlic on the pan. Toss with olive oil and salt and pepper making sure everything is evenly coated.
- Bake for 25 minutes or until the veggies have some color.
- Meanwhile in a large heavy bottom pot on medium heat saute the bacon until crispy. Remove with a slotted spoon, leaving its bacon fat in the pot, and set bacon aside for the garnish.
- When the vegetables are done in the oven add them to the bacon fat and saute for a minute. Add the chicken or vegetable stock to the pot making sure to scrape all the flavor bits from the bottom of the pot. Bring the soup to a boil. Turn it down to medium heat once it reaches a boil and simmer for 25 minutes or until the vegetables are very soft.
- Prepare all your garnishes while you wait for the vegetables in the soup to soften.
- Transfer the soup into a blender. Make sure to close the lid 100% and use a tea towel over the blender in case it splashes up. Blend until smooth. Place pureed soup back into the pot. simmer on low heat until you are ready to serve.
- Garnish and enjoy!
AA
Monday, November 6, 2017
Slow Cooker Meat Sauce
Ingredients
1 lb extra lean ground beef
1/2 lb ground pork
1 large yellow onions- diced
1 large red onion- diced
4 large carrots- diced
1 yellow pepper- diced
1 red pepper- diced
1orange pepper- diced
4 stalks of celery- diced
1/2 fennel bulb diced
10 brown mushrooms-diced
1 cup parsley stems- finely diced Reserve the leaves for garnish
6 large cloves of garlic- grated
1 tsp dried chilies
1 tsp fennel seeds
Salt and pepper
1 cup dry full bodied red wine
1/2 cup heavy cream
1/2 cup beef stock
2 bay leaves
1 can of diced San Marzano tomatoes
1 jar or tomato puree/passata
1/4 cup olive oil
Directions
1. Heat a large deep pan and saute the ground meat. Once the meat starts to sizzle add the fennel seeds , chilies, garlic and salt and pepper.
2. Once the meat is cooked dump it into a slow cooker. Using the same pan add the olive oil and saute the vegetables and parsley stems stirring often . Saute for 8 to 10 minutes until slightly cooked and starting to show some color.
3. Deglaze the pan with red wine scraping all the bits from the bottom. Once the alcohol evaporates after a minute or 2 dump all the pan ingredients into the crock-pot along with the meat.
4. Add the remaining ingredients to the crock pot and stir until well combined. Set the crock-pot on low for 6 hours.
5. Boil your favorite pasta making sure to follow the package for al dente cooking time. Remove the bay leaves from the sauce.
6. Toss with some freshly chopped parsley leaves and garnish with your favorite cheese.
7. Enjoy!
AA
Sunday, November 5, 2017
Sheet Pan Steinhart Maple Pork Chops
Steinhart Maple Vodka is something I discovered last year when I moved back to the province. It is great in cocktails, poured over ice cream, mixed into whipped cream or used in savory meals like my Sheet Pan Pork Chops. This easy meal is so moist, flavorful and satisfying on a chilly fall day you will want to add it in to the meal rotation every week. Growing up we would often have breaded pork chops and apple sauce and this recipe was inspired by that memory. This modern updated version is my new favorite way to enjoy a classic dish and another great way to enjoy my Steinhart Maple Vodka.
Ingredients
4 bone-in pork chops
2 yellow onions- sliced 1/2 inch thick half rounds
2 large honey crisp apples
4 cloves of garlic- do not peel
12 sage leaves
4 tbsp unsalted butter
2 tbsp olive oil plus 1 Tbsp for the onions and garlic
1tbsp of each garlic powder, paprika, black pepper
1/2 tsp sea salt
2 oz Steinhart Maple Vodka
NOTE: If you do not have maple vodka on hand you can substitute 2 oz of maple syrup. Whisk maple syrup with 1/2 cup of vegetable or chicken stock and deglaze with this liquid in place of the vodka in step 7.
Directions
1. Preheat oven to 400 degrees.
2. Mix garlic powder, paprika, black pepper and salt in a small bowl. Rub the mixture over the pork chops.
3. Slice the onions and place them in the sheet pan with the unpeeled garlic cloves. Toss in olive oil and scatter evenly across the pan. Slice the apples into wedges leaving the skin on. Remove core from each wedge and set aside.
4. Heat a large non stick pan. Once hot add the 2 tbsp of olive oil and sear the pork chops until they are a deep golden colour. It will be about 3 minutes per side on medium high heat.
5. Once seared place them on the sheet pan over the onions and garlic.
6. Add the butter to the pan and once melted add the apples and sage. Saute the apples on medium high heat until they are golden. Remove the sage leaves and set aside.
7. Deglaze the pan with the maple vodka and cook off the alcohol for about a minute. The apples should still be firm as they will bake in the oven later on.
8. Add the apple slice on top of each pork chop and pour all the pan juices over the chops as well. Place a few sage leaves on each pork chop.
9. Bake for 15 minutes or until the pork is just cooked through.
10. Let rest for 10 minutes covered with foil. Remove garlic skins and discard.
11. Serve over rice or cauliflower mash pouring some of the pan juices over each chop.
12. Enjoy!
AA
Saturday, November 4, 2017
Spaghetti al Tonno
15 MINUTE MEAL!!!! Spaghetti al Tonno is one of my fastest weeknight recipes and although it takes so little time to make it packs AMAZING flavor you would think you were slaving in the kitchen for hours. This dish for me, is the Italian version of a tuna casserole. It was also one of my childhood weeknight meals and I have wonderful memories of my mother every time I make this family favorite. The secret to this incredible tuna pasta is .....wait for it.....ANCHOVIES.
These little fish packed so tightly in a tiny tin and covered in olive oil are the key to a fast, bold, briny, salty, delicious pasta. The anchovies amplify the pasta sauce without making it taste fishy. I LOVE anchovies in my Caesar salad dressing, on my pizza, and in my Spaghetti al Tonno. I use the entire tin of anchovies in my pasta sauce but if you are unsure if you like anchovies start by only adding two or three the first time you make this dish instead of the entire can. I hope that you enjoy this meal and add this spaghetti sauce into the dinner rotation in your home.
Ingredients
Serves 4
1 tbsp extra virgin olive oil
1 tin of anchovies packed in olive oil
2 tsp capers
1 tsp chili flakes- optional
3 cloves of garlic- finely chopped or grated
1 can diced San Marzano tomatoes
1 can Italian tuna packed in olive oil
cracked black pepper
fresh parsley- chopped or torn for garnish
tbsp of salt - for the pasta water
500 grams of spaghetti- I combined black cuttlefish noodles and red pepper noodles (cooking times were the same)
Directions
1. Fill a large pot with water and turn the heat on high. While you wait for the water to boil you can make this very fast pasta sauce.
2. Using another burner, place a medium pot on the stove and set the temperature to medium high. Setting 5 or 6. Add the tin of anchovies with the oil they are packed in. Using a fork start mashing the anchovies in the oil and help them dissolve as the oil heats up. This takes about a minute. It is very important to do this because you do not want big pieces of anchovies visible.
3. Once the anchovies are dissolved in the oil they were packed in, add the extra virgin olive oil, capers, chilies and garlic. Saute for 2-3 minutes stirring often making sure the garlic does not burn.
4. Add the San Marzano tomatoes, tuna with the oil it is packed in and cracked pepper to taste. Mix well.
5. Add a good tbsp of salt to the boiling water followed by Spaghetti. Follow package instructions for cooking time. I usually cook my pasta 1 minute less than the package time. It will continue to cook once I add the sauce to the pasta.
6. When the pasta has 1 minute left remove one cup of the starchy pasta water and set aside.
7. Drain the pasta and place back into the pot on with the burner still set to medium high heat. Add the sauce to the pasta pot with some of the reserved pasta water. Only add a little water at a time to assist in making the sauce come together with the pasta.
8. Tear some fresh parley into the pot and mix until well combined.
9. Serve and ENJOY!!!!!!!!!!!!!!!!!
AA
Wednesday, November 1, 2017
Slow Braised Beef with Mushrooms and Onions
The weather is getting colder and I have been craving soups, stews and pasta dishes. This evening I decided to make a slow braised beef stew that loaded with mushrooms and onions. This braised beef is a great make ahead meal that can be prepared on the weekend and enjoyed throughout a busy work week. This meal is definitely one of my toddlers top 5 dinner meals. I could not even take a picture of this dish without him sticking his adorable fingers in the plate. I hope that you enjoy this meal as much as we do!
Ingredients
2 lbs beef stewing meat cubes
1 tbsp garlic powder
1 tbsp onion powder
1 tbsp paprika
1 tsp dried ground rosemary
1 tsp dried ground thyme
salt and pepper as desired
1/4 cup olive oil
1 large yellow onion - half moon sliced
4 medium portobello mushrooms- sliced
3 cloves garlic- finely grated
1 heaping tbsp Dijon mustard
2 tbsp Worcestershire sauce
900ml no salt added beef stock
2 cups of good quality full body red wine
1/2 cup fresh parsley chopped
Directions
1. Place beef cubes onto a sheet pan and toss them in garlic powder, onion powder, paprika, rosemary, thyme, and s&p.
2. Heat a large heavy bottom pot and add half the olive oil. Sear the beef cubes on all sides until they have a nice deep color. Do not crowd the pot or the beef will not sear. The beef may have to be seared in a couple of batches. Set seared meat aside.
3. Once all meat is seared, add the remainder of the olive oil and saute the onions and mushrooms on medium high heat for 5-6 minutes stirring often to avoid them burning.
4. Add the garlic and stir into the onions and mushrooms. Let cook for 1 minute and add the beef back into the pot.
5. Deglaze the pot with the red wine making sure to scrape all the flavor bits from the bottom of the pot. Let the alcohol evaporate for about a minute.
6. Add Worcestershire, mustard, beef stock and stir until all are well incorporated.
7. Turn heat to low and cover. Let cook on low for 2 hours or until the beef falls apart.
8. Garnish with freshly chopped parsley and served with oven roasted veg, peas and garlic bread.
AA
Tuesday, January 24, 2017
ChickpeaZa
If you want to satisfy your craving for pizza, but either have a sensitivity to flour or gluten, want to feed your kids a healthier version of their favorite meal, or are just trying to watch your carb intake, this recipe may be just the thing you are looking for. If you love the idea of delicious slices of your favorite toppings, with a boost of protein, try this recipe, which substitutes chickpea flour for wheat. It is extremely simple to make and it does not require kneading, special skill or machinery.
First, a caution, if you are looking for the crunch of biting into a crispy, traditional artisan dough, you may be slightly disappointed. What you will get instead is a meal that satisfies your craving, that holds up to whatever toppings you put on your protein-packed pizza and which will have you savoring every cheesy slice. I have tried many gluten free substitutions for pizza crust, and this is the most fabulous version yet. I can have my pizza and eat it too.
To make this crust you will need:
1 x medium glass bowl
1 x whisk
1 x 10 inch oven safe nonstick pan
1x spoon
1x pastry brush or basting brush
Ingredients
1 cup chickpea flour
1 cup luke warm water
1 tsp oregano
1/2 tsp sea salt
1/2 tsp extra virgin olive oil

Method
1. In a medium bowl whisk together all the ingredients except the olive oil.
2. Cover the bowl with plastic wrap and let rest on the counter for 2 to 2 1/2 hours.
3. Heat the oven to 425 degrees.
4. Place non stick pan in the oven to heat it up for 10 minutes. Remove pan from the oven and brush it with the 1/2 tsp olive oil.
5. Remove the pan from the oven and pour in the chickpea mixture. Gently place the pan in the middle rack of the oven and bake for 10 minutes.
6. Remove from the oven and turn the 10 inch crust over.
7. Cover with all your favorite pizza toppings- sauce, cheese and toppings (my preferred order).
8. Place on the bottom rack of your oven for an additional 8 to 10 minutes.
9. Slide out of the pan onto a board, slice and serve!
Buon Appetito
Sunday, December 18, 2016
Holiday Focaccia with Roasted Chesnuts, Orange Zest, Rosemary and Pink Sea Salt
As we head into the holidays, it is natural to look back to the year that was, to think of Christmases past, to look ahead to the new year and, of course, to indulge in all of our holiday favourites. One of my favourite ways to indulge and to bring back the smells and tastes of my childhood Christmases is by adding a holiday version of my homemade focaccia to the holiday table.
This focaccia recipe is very simple and can be made with a variety of toppings. I decided to use fresh roasted chestnuts, orange zest, rosemary and pink sea salt to elevate this recipe for Christmas. If you are looking to add some special touches to your meal, this is a great recipe that can feed a large group.
Ingredients for the dough
by weight
650g all-purpose unbleached flour
300g Italian OO flour
500g warm water
1x 7g packet of yeast
16 g coarse white sea salt
zest of one large orange
1 tbsp vegetable oil- used to grease a sheet pan
Ingredients for the topping
1 cup roasted, peeled and chopped chestnuts- score an X on the chestnuts and roast for 1 hour (this makes them easier to peel once roasted)
3 sprigs of fresh rosemary- picked from stem
2 tbsp Extra Virgin Olive Oil plus additional for spreading out the dough
1 tbsp orange juice
generous sprinkle of pink sea salt
Mixer Method
1. In a mixing bowl combine flour, OO flour, salt, yeast, orange zest, and warm water.
2. Using a dough hook attachment set on low speed, gently combine all the ingredients until the dough comes together.
3. Increase the speed one notch and continue to kneed the dough until it is smooth. This will take approximately 6-8 minutes.
4. Once the dough is smooth, it needs to rise. I tuck a SLIGHTLY damp cloth around the dough in the bowl and place in a warm spot until it is doubled in size. I turn my oven on to 425 degrees and leave the covered dough sitting on the stove to help it rise. It takes approximately 1 hour.
5. Spread the vegetable oil evenly around the sheet pan making sure to grease the entire pan and its sides. Set aside until needed.
6. When the dough is ready, gently pick it up from the bowl and push out the air with your hands.
7. Place the dough on the sheet pan and GENTLY spread it out on the sheet pan. I usually coat my hands in olive oil as I spread out the dough to make it easier to manipulate.
8. Once the dough is spread evenly on the entire pan, drizzle and brush about 1 tbsp of olive oil over the dough.
9. Make dimple marks on the dough, using your finger tips making sure not to puncture any holes through the bottom. Cover again with the SLIGHTLY damp cloth and let rise a second time for approximately 40 minutes.
10. Once dough is puffed up, gently press in the rosemary and chestnuts making sure they are still visible and not poking through the bottom. Add a generous sprinkle of pink sea salt to the top.
11. Bake the Focaccia on the lowest rack of your oven set at 425 degrees for approximately 10 minutes or until the bottom of the bread is golden brown. DO NOT leave the bread during this stage and watch it carefully to ensure it does not burn on the bottom.
12. Place the Focaccia on the middle rack to complete the baking once the bottom is nice a golden. Bake another 10-12 minutes until the top is a beautiful golden color.
13. In a small bowl whisk together 2 tbsp of the Extra Virgin Olive Oil and the orange juice. Once the bread is out of the oven lightly brush this fragrant liquid across the Focaccia. It will add a wonderful shine and flavor and give it that soft texture to your fresh bread.
14. Slice up and enjoy on its own or perhaps dipped into hummus, balsamic vinegar and olive oil or your favorite tapenade.
Happy Holidays and Buon Appetito!
Tuesday, January 19, 2016
Green Curry Vegetables
This recipe is very simple and versatile. It is a great way to use up all the extra vegetables that may be kicking around your fridge before a new grocery run. This week I had butternut squash, onions, red peppers, portobello mushrooms, celery, garlic and ginger in my crisper. Most of the time I make this recipe on purpose and use eggplant, red peppers, bamboo shoots and spinach. This time I thought I would stray from my routine and utilize the ingredients available. It is simple but delicious, and this recipe is a perfect way to welcome lunch or dinner any day of the week; especially a cold winter day.
Ingredients
1 small butternut squash- 1 inch cubes- you want the squash cubes slightly larger than the rest of the vegetables so they hold their shape a little better once cooked.
2 medium onions- sliced into bite sized pieces
1 large red pepper- sliced into bite sized pieces
2 portobello mushrooms- sliced into bite sized pieces2 celery stalks- sliced into bite sized pieces
4 large cloves garlic- finely grated or shaved
1 thumb size nub of fresh ginger- finely grated or shaved
1 tsp. Sambel olek or 1 fresh Thai chili- finely diced
1 tsp. cumin seeds
1/4 cup of avocado oil plus 2 tbsp
2 heaping Tbsp green curry paste
1 1/2 cups vegetable stock- no sodium added
2 dried lime leaves
1 398ml can coconut milk- I used light
Salt and pepper to taste
Garnish with cilantro micro greens, chives or scallions
Directions
1. Preheat oven to 400 degrees.
2. Line a sheet pan with parchment paper.
3. Place the chopped peppers, squash, onions, mushrooms, celery and half the garlic and ginger onto the pan.
4. Season with salt and pepper and toss with 1/4 cup of avocado oil.
5. Bake for 35 minutes.
6. While the vegetables are baking start the curry sauce.
7. Place the 2 tbsp. of oil in a deep pan and sauté the remaining ginger, garlic, cumin seeds, and fresh chili or Sambel Olek for 3-4 minutes on medium heat to extract flavors.
8. Add the vegetable stock, green curry paste, coconut milk and lime leaves to the pan and bring to a simmer.
9. Once the vegetables are out of the oven, add them to the curry sauce and turn the temperature to low. Let simmer for 20 minutes. Taste and add additional salt and pepper if needed or desired.
10. Garnish each dish with cilantro micro greens, chives or scallions.
11. Serve with nann bread or brown rice if desired.
12. Enjoy!
Thursday, January 14, 2016
Cabbage Rolls
Cabbage rolls are a fantastic winter classic that can be prepared in advance and will yield many portions for future meals. I tend to only make this dish once a year during the winter months as to this recipe makes 20 good sized rolls leaving my freezer stocked with all the extras. This is another make ahead meal that I tend to make on the weekend as it takes more time to prepare than an average weeknight meal. My rolls are jammed packed with vegetables, beef and rice, thinly rolled with savoy cabbage as the vessel holding all these wonderful ingredients in place. They are bathing in a simple tomato sauce and chicken stock mixture and garnished with fresh parsley. If you like cabbage rolls, give this recipe a try.
Note: I have made this recipe with a mixture of ground pork and beef, but I find it a little lighter with extra lean ground beef. If you prefer to have pork in your cabbage rolls, just go for it!
Ingredients
Yield 20 cabbage rolls
1 head of Savoy cabbage
2 Tbsp extra virgin olive oil
1 medium red onion- finely diced
1 large carrot- finely diced
2 celery stalks- finely diced
2 cloves garlic- finely diced
1 cup of rice- I used whole wheat long grain
1/2 cup dry white wine
2 cups of no salt added chicken stock plus an additional 1cup
1 1/2 pounds of extra lean ground beef
1 egg1 tsp. dijon mustard
1 splash of worsheshire sauce
1 tsp chili flakes
1/2 cup finely grated parmesan cheese
Salt and pepper as preferred
1/2 cup seasoned bread crumbs
3 cups of tomato sauce
1/2 cup of finely chopped fresh parsley
Directions
1. Preheat the oven to 350 degrees.
2. Bring a large pot of water to a boil.
3. Trim the stem of the cabbage slightly and add the whole Savoy cabbage to the boiling water. Boil for 5-7 minutes. As the cabbage heats up you can start pulling back the leaves gently with a pair of tongs. Place the individual cabbage leaves in a bowl of ice water once they peel away, to stop them from cooking further. Continue this method until 20 leaves are pulled away from the cabbage ball. Reserve inner cabbage leaves for future use.
4. Cut out the thick white stem from each leaf, making sure not to completely sever the cabbage. Set the leaves in a colander to drain. Finely dice the white stems that were removed from the cabbage leaves and set aside.
5. Heat a large non stick pan and add the olive oil.
6. Add the onions, carrots, celery and cabbage stems to the pan and sauté for 7 minutes on medium high heat until the ingredients start to soften and become slightly golden.
7. Add the garlic and continue to sauté for an additional 3 minutes.
8. Add the rice and toss until all the ingredients in the pan are well mixed.
9. De glaze the pan with the white wine.
10. Add the 2 cups of chicken stock to the pan and stir gently. Cover and cook until the rice is 75% cooked. It should be soft on the outside but crunchy in the middle. The rice will cook completely once the cabbage rolls bake in the oven. If you cook the rice 100% at this stage it will become mushy and overcooked once the cabbage rolls are baked.
11. Once the mixture is ready set aside to cool slightly.
12. In a large bowl, mix the beef, egg, breadcrumbs, cheese, worsheshire, mustard, chili flakes and salt and pepper.
13. Add the rice mixture to the raw beef mixture and fold the ingredients together until well incorporated.
14. In a large casserole dish, pour the tomato and 1 cup of chicken stock into the bottom and mix together. Once the cabbage rolls are rolled up place them on the liquid mixture.
15. Take each cabbage leaf and overlap it slightly where the stem was removed.
16. Add roughly 3 tablespoons of filling to each leaf and roll up folding in the sides as you roll.
17. Place each roll into the casserole dish.
18. Once the rolls are all made and in the casserole dish, cover and bake for 35 minutes.
19. Garnish the cabbage rolls with freshly chopped parsley and enjoy!
Note: If I am serving this for company I garnish with a splash of good quality extra virgin olive oil and parsley.
Tuesday, January 12, 2016
Eggplant Penne
Eggplant is one of my favourite vegetables to cook with. I use it to make dips and stir fry, and love it grilled or oven roasted as a side dish, on pizza and in pasta. This recipe is something I usually make on the weekend as it does take longer than a week night thirty minute meal. I usually batch cook a few dishes on Sunday that take lots of time, to make lunches and dinner time a breeze during a busy work week. This dish is an AWESOME make ahead meal and becomes more flavourful the longer it permeates together in a bowl. In addition to reheating this meal after work during the week, this dish can also be served as a pasta salad and is a great item to bring as a potluck dish or pack for lunches. Although I am not a vegetarian, I do make 2-3 vegetarian meals per week that can be incorporated into lunches and dinners so we have more vegetables in our diet. This is definitely one of my favourite vegetarian dishes. If you are gluten sensitive you can substitute rice penne noodles and it will still taste DELISH!
Ingredients
500grams penne
1 cup of extra virgin olive oil plus 2 tbsp for garnish
4 eggplants- cut into 1 inch cubes
4 large cloves of garlic- thinly sliced or grated
8 large ripe vine tomatoes- diced or 796ml can of diced tomatoes
1 tsp dried chili flakes- optional
1 bunch of both parsley and basil- stems removed an diced and leaves chopped for garnish
Salt and pepper
Feta cheese
Directions
1. Slice the washed eggplant into 1 inch cubes and lay flat on a sheet pan.
2. Sprinkle generously with sea salt. This will extract the bitter moisture from the eggplant. Set aside and let rest for thirty minutes.
3. Preheat the oven to 350 degrees.
4. In a medium bowl, combine the tomatoes, garlic, parsley stems, basil stem, chili flakes and olive oil. Season with salt and pepper and taste and toss the mixture until well combined. Taste to ensure it is seasoned to your liking, and set mixture aside.
5. Place the eggplant in a sieve or colander and rinse to remove the liquid that was extracted after being sprinkled in sea salt. Shake off any excess water.
6. In a large casserole dish toss together the eggplant and tomato mixture until well incorporated. Cover and bake for 45 minutes.
7. Uncover the eggplant and stir the mixture. Place back in the oven for another 30 minutes uncovered. The eggplant should be soft but still be identifiable and not cooked to the point of being a tapenade.
8. Cook the penne pasta according to the package specifications once the eggplant is 15 minutes from ready. Reserve 1 cup of pasta water just before you drain the noodles.
9. Toss the cooked pasta into the casserole dish with the eggplant and pasta water.
10. Garnish with freshly chopped parsley and basil leaves, feta and extra virgin olive oil.
11. Enjoy!
Note:
If you are making this dish for a future meal or potluck add the feta and herbs just before serving the pasta.
Wednesday, July 8, 2015
Baby Back Ribs
Everyone has an opinion on how to cook the perfect rack of ribs. Boiled, braised, smoked, oven roasted, slow cooker crock pot method and pressure cooked are all methods I have tried in the past and I still use a few of them to make a delicious tender rack of ribs. My absolute favorite way to indulge in pork heaven is by oven baking the ribs. I leave them uncovered while cooking to create a crusty dry rib texture on the outside and have them sitting in an inch of white wine to assist in making them tender on the inside. They are crispy and flavorful, yet moist and tender. The glaze is a perfect balance of sweet and savory with a hint of spice. I had our neighbours and friends sample the ribs and they LOVED them. In fact, they made this recipe for a recent dinner party and the ribs were a huge success. I promised to share this recipe for them, and all other die hard rib fans.........
Cleaning the baby back ribs.
1. Take the ribs out of the packaging and turn them over. Using a paring knife, lift the membrane up away from the bone so you can easily pull the entire clear membrane off the rack of ribs. It helps if you pat the membrane with a paper towel first to make it less slippery to work with.
2. Trim any excess fat or end bits off the rack of ribs.
3. Wash the rack of ribs and pat them dry before moving on to the next step. It is critical that the meat is dry before seasoning to achieve a crispy texture on the outside of the rib while roasting.
4. Cut the rack of ribs in half and place into a deep rectangular foil baking pan. Each large baking pan should fit 2 racks cut into 4 sections. Place them flat in the pan. Do not overlap the meat.
Prepping the baby back ribs for the oven.
1. Preheat the oven to Convection roast or bake at 425 degrees.
2. Season the top of the ribs GENEROUSLY and EVENLY with the following ingredients:
garlic powder
sea salt
cracked black pepper
dried rosemary
3. Pour some dry white wine into the pan without letting any spill onto to top of the ribs. There needs to be at enough liquid to just touch the bottom of the rib bones without covering the meat above the bone. If you don't prefer to use white wine you can use beer, stock, water or any alcohol you think would go well with pork.
4. Place the ribs in the oven and look in on them every half hour to make sure there is still liquid at the bottom of the pan. If it all evaporates add some water to avoid the pan and ribs burning.
5. As soon as the ribs are in the oven, start the glaze on the stovetop. To make enough glaze for 2-3 racks you will need the following ingredients:
3-4 cloves of garlic- grated
1/2 tsp. cumin powder
1 tsp. chili sauce- I used Sambal Oelek
2-3 Tbsp. canola oil or avocado oil
1/2 cup low sodium soy sauce
2-3 Tbsp. honey
1 1/2 cups Tropicana orange juice (lots of pulp)
zest of 1 orange and 1 lime- for garnish (optional)
1. Place the oil, garlic, chili sauce and cumin into a medium sauce pot and sauté on medium heat for a few minutes until the garlic is slightly golden. Do not walk away from this pot at this stage as the garlic can easily burn.
2. Add the soy sauce, honey and orange juice to the pot and stir until well incorporated. Bring to a boil.
3. Once the sauce is boiling, turn the temperature down to low and let simmer the entire time the ribs are in the oven.
4. If an hour has passed, turn the ribs over to crisp up the back side. Set the timer for 30 minutes and check the ribs. Turn them back over if they are crispy at this time. Make sure there is still liquid at the bottom of the pan. If not add some water. DO NOT let the bottom of the pan dry up or it will burn and impact the taste of the meat.
5. Once the ribs have been cooking for 1 1/2 and have been turned back over with the top facing up it is time to glaze the ribs.
6. Using a basting brush, spread the thin glaze over the ribs, making sure all the bits and pulp soak into the meat. Use all of the glaze. It will not be thick like honey but it will thicken once in the pan. Continue basting the ribs every 15 minutes or until the ribs are tender and the sauce is sticking to the meat leaving them shiny and gorgeous.
7. Take the ribs out of the oven after 2 to 2 1/2 hours of cooking. If you place a paring knife into the ribs and it easily goes through, it means they are ready.
8. Rest the ribs for at least 10 minutes before slicing into the meat.
9. Once sliced, garnish with orange and lime zest if desired.
10. Enjoy!
Note:
Every oven is different, so make sure if your ribs are getting very dark in color to simply turn down the temperature.
Monday, May 11, 2015
Cheat Omelettes aka The Wafflette and Soufflé Egg Balls
Omelettes are a frequent breakfast item in my home both during the week and on the weekend. My husband and I both LOVE having a hot breakfast whenever possible, and different variations of this delightful day changer always keep us wanting more. Often, friends have told me that they have a difficult time making a hot breakfast for their family during the week. It Is much easier to have cereal, instant oatmeal, fruit or yogurt for breakfast when time is a factor.
What if I told you that you could have a hot breakfast with fresh eggs, vegetables and cheese in the same amount of time it would take to wash and slice fresh fruit or gather the ingredients for a morning smoothie? It requires some planning, but it works! I made a hot breakfast for my husband and I in 5-8 minutes. It was so fast and easy I had to share my cheat Omelettes with all of you. I have created two variations of this breakfast. The first is what I like to call a "Wafflette", or a Waffle Omelette and the second is Soufflé Egg Balls.
This is how I did it:
When I woke up, I went down to the kitchen and started brewing a fresh pot of coffee. Before heading up to the shower, I plugged in the waffle maker. Once I was ready, I took eggs, scallion, shredded cheese, mushrooms and red pepper out of the fridge. I cracked the eggs into a measuring cup and quickly diced the vegetables. I dropped the vegetables and cheese into the measuring cup and seasoned with dried chili flakes, salt and pepper. I whisked until well combined, sprayed my waffle maker with non stick cooking spray and poured the egg mixture, spreading it evenly before shutting the lid. THREE minutes later my hot Wafflette was ready. The outer exterior had delicious crispy bits from the cheese and it was fluffy and moist on the inside. SOOOOOOOO TASTY! It can also be placed in a whole grain bun or English muffin and wrapped in parchment to be eaten as you run out the door. If you are not confident with flipping eggs and folding over traditional or crepe style Omelettes, or if time is a factor, this recipe is for you!
The second variation is a lighter oil-free version. In order to make these delicious egg balls, a non-stick poaching pan is needed. I purchased mine new at Costco 3 years ago and use it a every week. It was an affordable investment that has made hundreds of eggs over the past few years. I used exactly the same ingredients except left out the oil and cooking spray that I would normally use when making a Wafflette.
This is how I did it:
When I woke up I went down to the kitchen and started brewing a fresh pot of coffee. Before heading up to the shower, I placed 2 inches of water in the bottom of the poaching pan and set the covered pan on low over the stove. Once I was ready, I took eggs, scallion, shredded cheese, mushrooms, and red pepper out of the fridge. I cracked the eggs into a measuring cup and quickly diced some the vegetables. I dropped the vegetables and cheese into the measuring cup and seasoned with dried chili flakes, salt and pepper. I whisked until well combined. I poured the mixture into each egg slot, filling each slot 3/4 full. Cover and in 8-10 minutes the egg balls puff up like a soufflé and are ready to eat or pack up for an on-the-go snack.
This version is very popular with both children and adults because each batch can be customized utilizing different ingredients. This is a fun substitute for regular hard boiled eggs and is great for breakfast, as a snack at the office, for a mid-morning protein boost or a late-afternoon or post-workout snack. Hard boiled eggs get very boring, so having an alternative with some vegetables is a nice change. This recipe takes 8-10 minutes and can be made in advance similar to a hard boiled egg.
Both recipes are listed below and BOTH can be made the evening before and reheated in the microwave if desired.
In addition I have included a STEP by STEP picture demonstration in order to help you make a crepe style omelette, when time is not a factor. I hope that these recipes inspire you to change up your morning routine.
Wafflette
For every two people use:
2 eggs
1/4 cup shredded cheddar
1 scallion- diced
2 mushrooms- diced
1/2 red or green pepper- diced
pinch of salt, pepper
pinch of cayenne pepper- optional
garnish- tomatoes, herbs, avocado, greens- optional
The ingredients above will make 2 Wafflettes
1. Plug in the waffle iron.
2. Whisk all the ingredients in a measuring cup.
3. Spray the waffle iron with non-stick cooking spray
4. Pour the mixture evenly into the waffle iron making sure to spread the toppings evenly.
5. Seal the lid shut and wait 3 minutes.
6. Open waffle iron and gently lift out the Wafflettes.
7. Garnish if desired and enjoy!!!!

Soufflé Egg Balls
Yield 6 balls
2 eggs
1/4 cup shredded cheddar
1 scallion- diced
2 mushrooms- diced
1/2 red or green pepper- diced
pinch of salt, pepper
pinch of cayenne pepper- optional
garnish- tomatoes, herbs, scallions- optional
1. Fill the poaching pan with two inches of water, cover pan with lid and heat until water is simmering.
2. Whisk all the ingredients in a measuring cup.
3. Pour the mixture evenly into each egg slot. Make sure the toppings are distributed evenly.
5. Seal the lid and cook for 8 minutes. Each soufflé will puff up.
6. Gently remove each egg ball from the pan.
7. Garnish if desired and enjoy!!!!
How to make a 2 egg crepe style omelette:
Step 1
Heat a 10 inch non-stick pan on the stove on medium heat.
Step 2
Meanwhile, whisk together the following ingredients in a bowl:
2 eggs
pinch of salt and pepper
Step 3
Add 1 Tbsp. of avocado or vegetable oil to your pan and add:red pepper- diced
1 scallion- diced
parsley- finely chopped
Sauté for 2-3 minutes.
Step 4
Turn the heat down to low and pour in the egg. Gently swirl the pan to ensure the egg EVENLY covers the bottom of the 10 inch pan. Cook on low until the egg looks set and you are able to work with it and flip it without breaking. Tilt the pan toward you and gently slide a spatula under the egg. If you are able to lift the egg it means it is ready to flip. Flip the egg.
Step 5
Fill the omelette with cheese and greens.
Step 6
Gently fold over. Leave the omelette on low heat for a couple minutes until the cheese melts and the greens wilt.
Enjoy!!!!
Subscribe to:
Posts (Atom)